Hello Open Source
Last updated on 2026-07-28 | Edit this page
Overview
Questions
- What is open source?
- What is GitHub Pages?
- How can I use GitHub Pages to collaborate and share my work?
Objectives
- Create a GitHub repo
- Complete the steps to make a commit
- Differentiate Markdown and HTML
- Differentiate source and rendered content
- Identify the parts of the GitHub Interface
- Create a Website using GitHub Pages default settings
- Share the link to your webpage with a partner and confirm they can view it
- Consider what options there are to collaborate on a website or contribute to someone else’s webpage
What is open source
Open source is when a software or a project is published online and available to the public to view the details of or contribute to.
Let’s use an example of our own to see what it’s like to have an open source project.
GitHub
GitHub is a developer platform that allows developers to create and hold projects on it. It is benificial for reasons such as managing different versions of a project, collaboration and task management.
GitHub Pages
GitHub Pages is a simple service to publish a website directly on
GitHub from a Git repository. You can add some files and folders to a
repository and GitHub Pages turns it into a website. There are multiple
ways of doing so, either by having GitHub use an HTML file
(index.html) directly to publish, or by using a tool that
GitHub provides called Jekyll which renders Markdown into HTML. You can
use the contents of one md file directly named either
README.md or `index.md and Jekyll will render them into a
webpage making it really easy to setup a blog or a template-based
website. You can then configure Jekyll with more detailed configuration
settings to make your webpage more customized. There are many tools to
convert markdown (or other simple formats, like RestructuredText) to
HTML, called static site
generators. We will see another one later, called Mystmd (read myst
Markdown). In this case the markdown is called the source and
the HTML is the rendered output. One way to think about source
is that it is all of the contents you need to get to the output, but in
an easier to modify form. The rendered output is what we want to share
with our users, here readers, but the source is easier to manage. The
static site generator, combines everything. This makes it so that
content that should appear for example on every page does not need to be
repeated. It also allows us to separate the content from the visual
style for the most part.
These are static sites because other tools, for example wordpress, also separate the content and the style, but they do so dynamically, when a visitor goes to the website, it pulls content from a database, inserts it into the html and then sends it to the visitor’s browser. ### Why GitHub Pages is awesome!
GitHub Pages provides an easy way to publish your material mostly for
free with easy means to modify it and format it with a nice theme of
your preference. It also comes with all the collaboration and version
control features that Git and GitHub provide us with.
Version control features can be very useful for academic citations. Most
people have had the experience of following up a reference to a website
and either getting a 404 error or seeing something completely different.
Although using versions on your site doesn’t guarantee this won’t
happen, it does make it easier to manage old versions of your site. More
on that later.
Creating a new repository
A repository can be thought of in many ways, you can think of it as a big folder that holds all the files of your project, or like a vessel that contains all the data and meta-data of your project. Overall a repository is an entity that represents one full project.
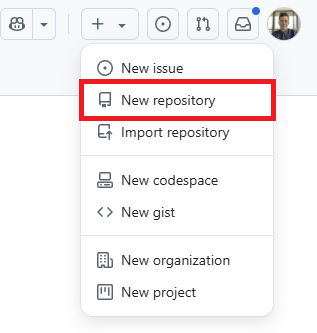
To create a new repo login to your GitHub account. At the top, right
corner click on the + sign and choose
New repository
Give your repository a meaningful name that suits the contents it
shall hold. And we encourage adding something to the optional
description section. Toggle the Add a README file button
and click on the green Create Repository button.

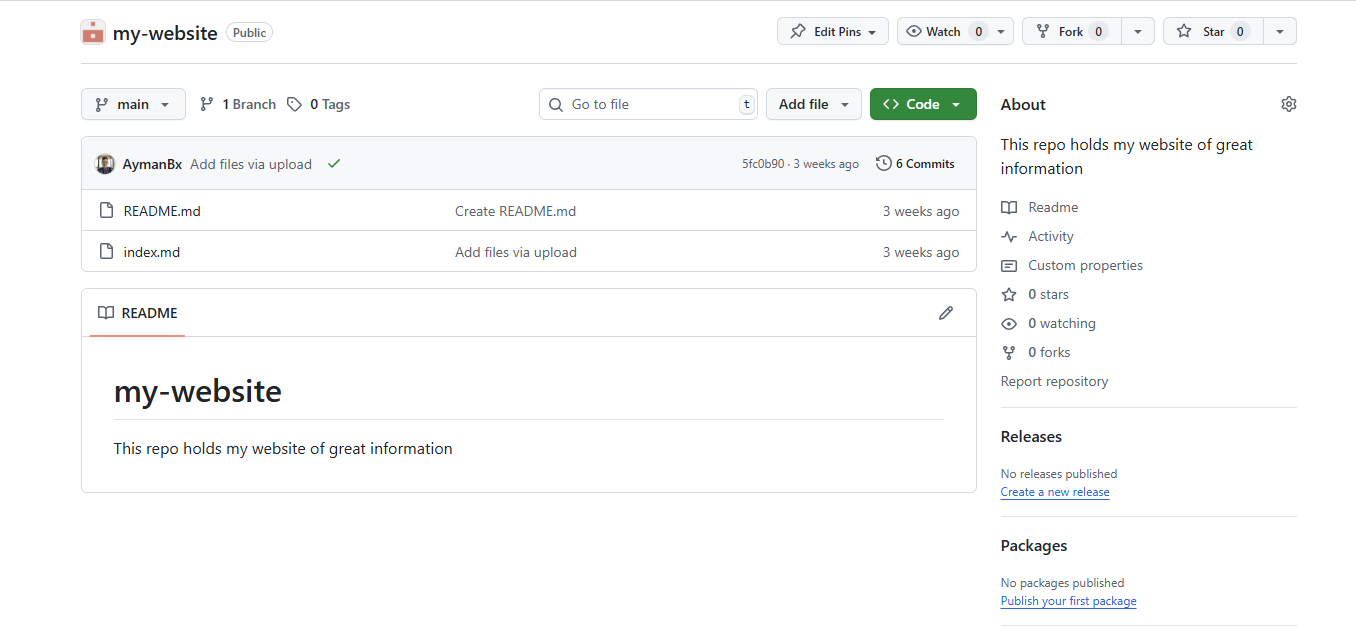
Here is a preview of how the new repo would look like:
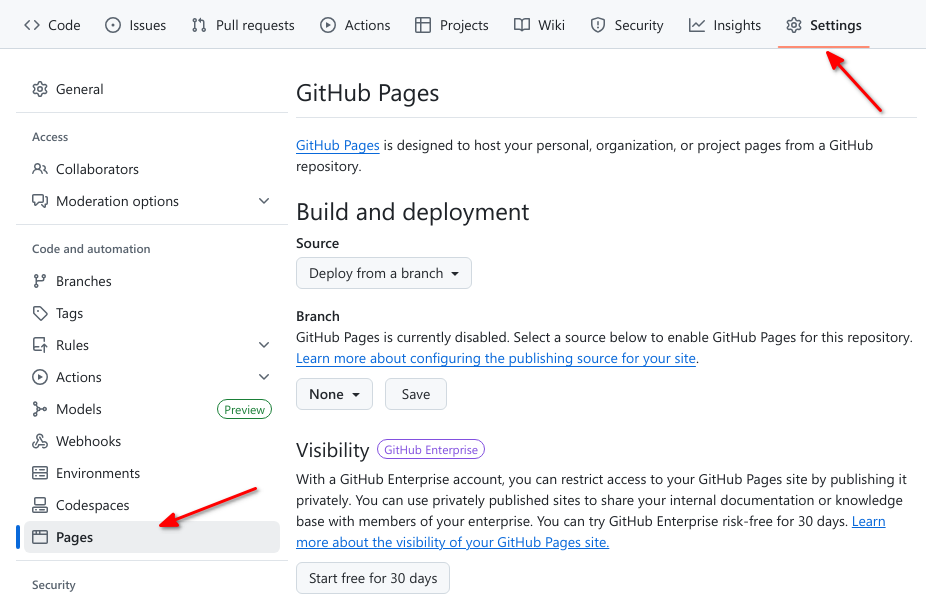
Enable GitHub Pages
GitHub Pages is turned off by default for all new repositories, and can be turned on in the settings menu for any repository.
Let’s set up a new site by enabling GitHub Pages for our project.
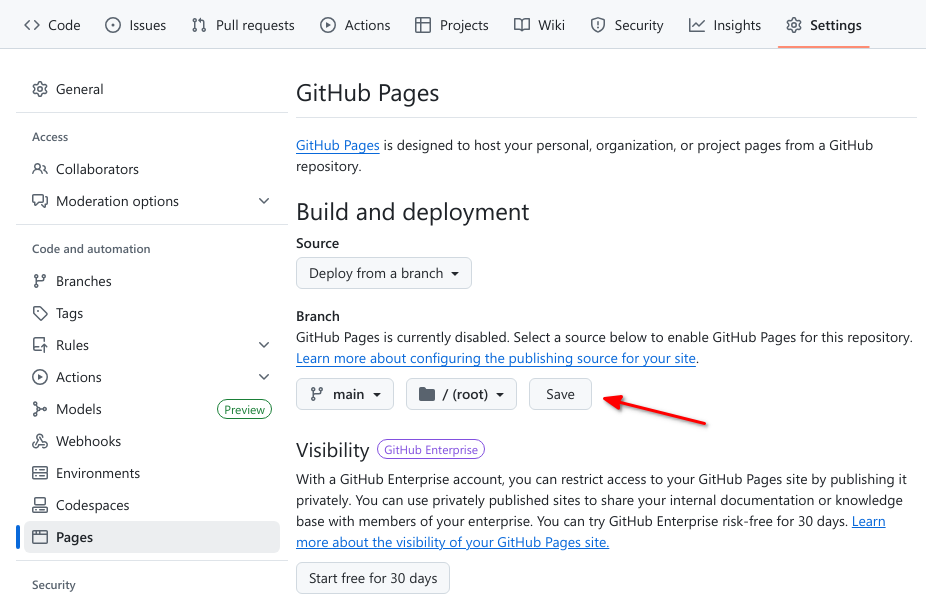
Go to the Pages section of your repository’s Settings:
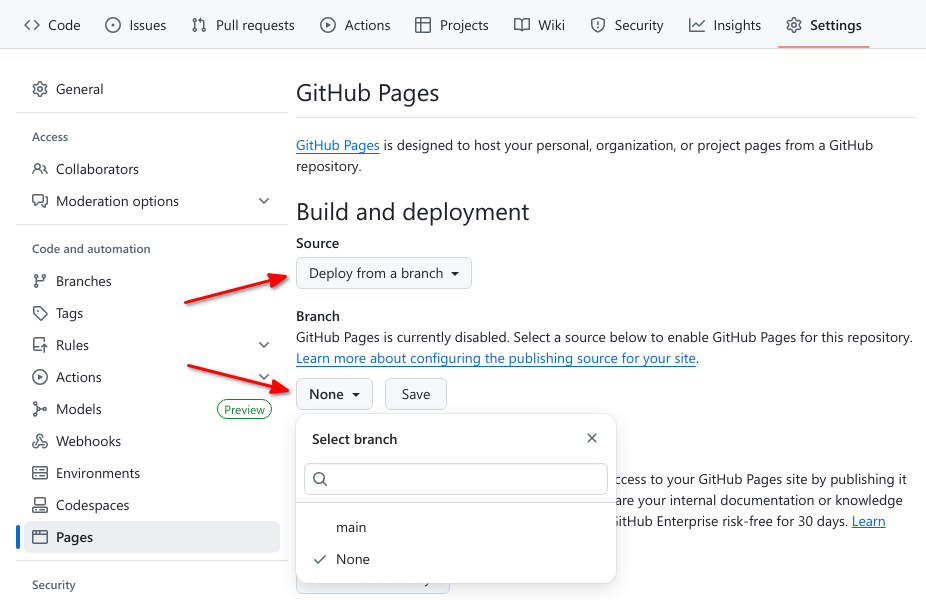
Source branch (required)
Pages needs to know the branch in your repository from which you want
to serve your site. This can be any branch, including
main.
Select then save the source branch:
Theme (optional)
GitHub Pages provides different themes to visually style and organize your site’s content. Choosing a theme is optional, and themes can be interchanged quickly.
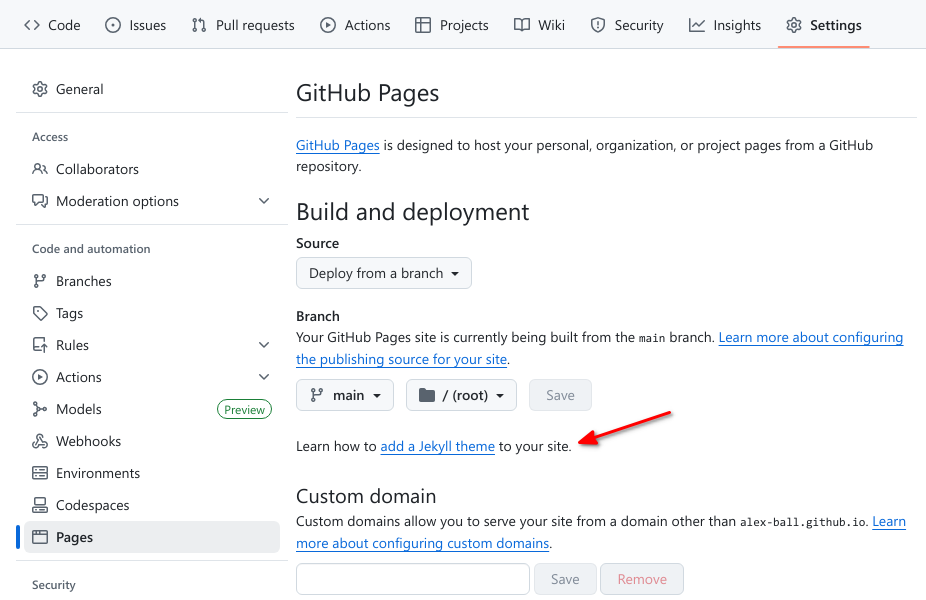
See the GitHub Pages documentation for further information on using themes.
View your site
If we now visit
https://mystudyroom0.github.io/my-website/, we should see
the contents of the index.md file that created earlier. Usually it’s
available instantly, but it can take a few seconds and in the worst case
a few minutes if GitHub are very busy.
And here’s a preview of the new website

Here, my repository was owned by an GitHub organization (or group)
named mystudyroom0, hence the name in the link. The
repository is named my-website, hence the header of the
page. And the content was what I had typed inside my README
file which in this case was rendered to be the content of the
webpage.
Challenge: View your own webpage:
See if you can find the link to your newly generated webpage and share it on eitherpad. Add the link to your webpage to the about section of your repository.
Remember where in the settings we enabled GitHub Pages, the link should be right there.
To update your repo’s about to add the link to your webpage you can
find the about section in the right hand side of the main page of your
repo. 
Click on the gear button and paste the link in the website box.

Adding new content to your webpage
Find a text file of an article of yours or a one page paper that you would want to see used as the content of your new webpage.
On your repository code<> page click
Upload files from the Add file dropdown
menu

Drag your file and drop it in the following page and select
Commit changes

A commit is an annotated change or a checkpoint in a repository. We shall talk more about it later on.
After successfully uploading the file it can be found in the list of
files of your repo. Click on it to open it and then click on the edit
button on the top of the file.
Rename the file to index.md then commit the changes
again.

Notice the “commit message” automatically generated by GitHub regarding this change.
Wait a minute for the new changes to render and then view your website again

Challenge: Contributing to a page owned by someone else
To practice open source, GitHub and Markdown we can contribute to a GitHub pages site. Pair up in groups of two (or more if needed) and do the exercises below together.
Go to https://github.com/some-humanist/my-website, where “some-humanist” is the username of your exercise partner.
Find the website link in their about section of their repo and open it.
Scroll to the bottom of their webpage and find the button that says
improve this page.Click on
Fork this repository. This takes you to a file editor that edits your partner’s article.Now is good chance to try some Markdown syntax. Try some of the examples at Mastering Markdown. You can preview how it will look before you commit changes.
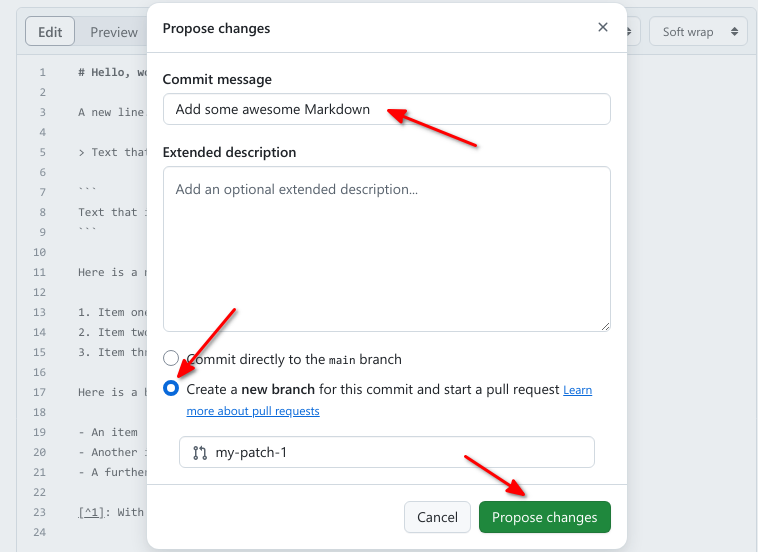
Once you are ready to commit, enter a short commit message, select “Create a new branch for this commit and start a pull request” and press “Propose changes” to avoid commiting directly to the main branch.
You can now go to the repository on your account and click “New Pull Request” button, where you can select base branches repositories, review the changes and add an additional explanation before sending the pull request (this is especially useful if you make a single pull request for multiple commits).
Your partner should now see a pull request under the “Pull requests” tab and can accept (“Merge pull request”) the changes there. Try this.
This whole process of making a fork and a pull request might seem a bit cumbersome. Try to think of why it was needed? And why it’s called “pull request”?
We made a fork and a pull request because we did not have permission to edit (or commit) the repository directly. A fork is a copy of the repository that we can edit. By making a pull request we ask the owner of the repository if they would like to accept (pull in) the changes from our fork (our copy) into their version. The owner can then review the changes and choose to accept or reject them.
A fork is a copy of someone else’s project that is owned by you!
A pull request is a proposal from you to the owner or lead of a project to make some changes to it. More on PRs later.
You can open pull requests on any repository you find on GitHub. If you are a group of people who plan to collaborate closely, on the other hand, it’s more practical to grant everyone access to commit directly instead.
Optional challenge: Adding an HTML page
GitHub Pages is not limited to Markdown. If you know some HTML, try adding an HTML page to your repository. You could do this on the command line or directly on GitHub. The steps below are for working directly on GitHub:
- To add a new file directly on GitHub, press the “Create new file” button.
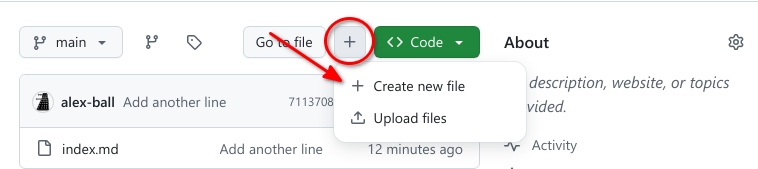
Name it ‘test.html’, add some HTML and click “Commit new file”.
Try opening
https://some-humanist.github.io/hello-world/test(replace “some-humanist” with your username). Notice that the HTML extension is not included.
- When editing fils in GitHub.com, we have to commit to save changes
- A commit is a snapshot that we can go back to
- Markup languages use special formatting to label the content and indicate styling in addition to the content in the file, examples include Markdown, ReStructured Text (out of scope), XML, and HTML
- Markdown is a a style of markup that is human and machine readable, it is rendered as HTML
- HTML is the formt of markup that web browsers use
- Source content is what we edit and may content developer information, rendered content (or built) is what is for the reader, output by a build process
- GitHub Pages offer a free host for a website that is rendered from simple text
- Collaboration and version control rules and workflows can be used with GitHub Pages as we shall see in future episodes