GitHub Pages
Last updated on 2026-07-28 | Edit this page
GitHub Pages
GitHub Pages is a simple service to publish a website directly on GitHub from a Git repository. You add some files and folders to a repository and GitHub Pages turns it into a website. You can use HTML directly if you like, but they also provide Jekyll, which renders Markdown into HTML and makes it really easy to setup a blog or a template-based website.
Enable GitHub Pages on the hello-world repo
Remember: GitHub Pages is turned off by default for all new repositories, and can be turned on in the settings menu for any repository. Let’s set up a new site by enabling GitHub Pages for our recently created project.
- On your GitHub view of the hello-world project, go to the settings from the top tab menu
- Find
Pageson the list on the left - Change where it says
Nonetomainunder `Deploy from a branch
View your site
Usually it’s available instantly, but it can take a few seconds and
in the worst case a few minutes if GitHub are very busy. On the main
code page of your repo, find the about section and edit it
to include the link to your webpage and try opeinging the link Share the
link on Eitherpad
Check the box that says
Use your GitHub Pages website
Clone your “my-website” locally and explore its content
Today we created a repo (project) locally (on our terminal) and then created an online duplicate of it, then we linked them to each other to be able to “push” and “pull” changes. Basically saving our work on a cloud.
Now, let’s do it the other way around. We created a project online on day 1 called my-website. Let’s now create a local copy of this project to ourselves to be able to make changes to that project locally.
Use this instructional page to read about how to do so
- On your terminal
cdinto a folder where you want to have the local copy of your repo - run the command
git clone <link_to_project> - Confirm this was successful with
ls - Check the contents of the newly added project folder using
cd,lsandcat
Add material to your webpage locally
Now that we’ve become more comfortable with the shell and using git on the shell.
We’re going to add the material we had prepared, add it to our webpage and view it.
Start by copying the file of your choosing or the contents of it into a new file in your local repo.
Challenge: Contributing to a page owned by someone else (slightly easier way)
To practice using Git, GitHub pages and Markdown we can contribute to a GitHub pages site. Pair up in groups of two (or more if needed) and do the exercises below together.
Go to https://github.com/some-librarian/hello-world, where “some-librarian” is the username of your exercise partner.
Click on “Fork” in the upper right part of the screen to create a copy of the repository on your account. Once you have a fork > of your partner’s repository, you can edit the files in your own fork directly.
Click the “index.md” file, then click the edit pencil icon:

Now is good chance to try some Markdown syntax. Try some of the examples at Mastering Markdown. You can preview how it will look before you commit changes.
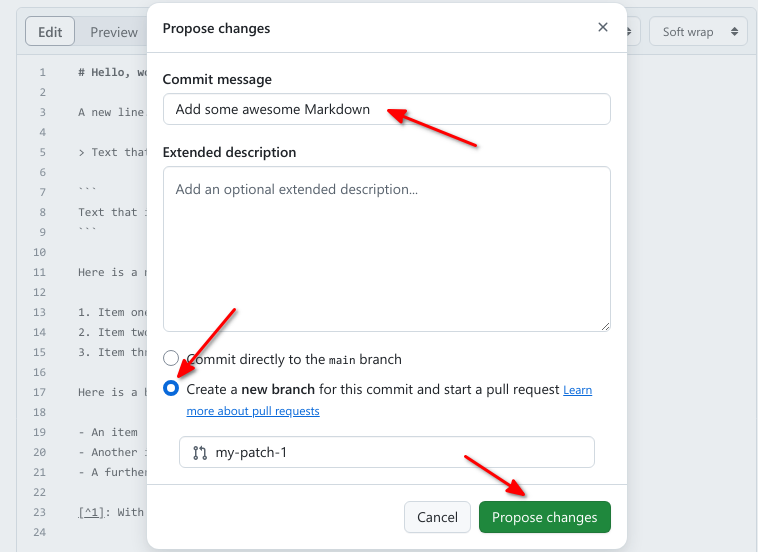
Once you are ready to commit, enter a short commit message, select “Create a new branch for this commit and start a pull request” and press “Propose changes” to avoid commiting directly to the main branch.
You can now go to the repository on your account and click “New Pull Request” button, where you can select base branches repositories, review the changes and add an additional explanation before sending the pull request (this is especially useful if you make a single pull request for multiple commits).
Your partner should now see a pull request under the “Pull requests” tab and can accept (“Merge pull request”) the changes there. Try this.
This whole process of making a fork and a pull request might seem a bit cumbersome. Try to think of why it was needed? And why it’s called “pull request”?
Optional challenge: Contributing to a page owned by someone else (slightly more complicated way)
Instead of making edits on the GitHub website you can ‘clone’ the fork to your local machine and work there.
Challenge
Try following the rest of the steps in this guide under “Time to Submit Your First PR”.
(If you followed step 1 and 2 in the previous challenge, you already have a fork and you can skip the creation of a new fork. Start instead at the section titled “Cloning a fork.” You can submit multiple pull requests using the same fork.)